Shop Talk w Devin...

Let’s dive into the world of bicycle maintenance, safety, preparedness, and all things associated with cycling. My goal with this blog is to engage our local cycling community in discussions and improve your knowledge of your own bicycles. I believe everyone should have the skills to change a flat and should be familiar with how their bicycle works, plus what to do in case of an emergency. Join me as we go on this adventure together. My name is Devin Bovee I am, a father, a cyclist, a bike mechanic, a bike shop Manager and an advocate for people to get on their bikes. Reach out to me via email Devin@stevensbicycles.com or give me a call 559.797.0148.

<< First  < Prev   1   2   Next >  Last >> 
  • 03/18/2019 8:16 PM | Deleted user

       We all know that Cal-Trans maintains our roads, and (for the most part) keeps the rural areas fairly neat for road cycling. If you’re riding within Fresno or Clovis city limits, you can contact the city to come out and remove debris from the bike lanes. But what happens when you ride Gravel or Mountain bikes? Who handles those trails? Well, we are lucky enough to have other local clubs and groups in the area that operate just like our Fresno Cycling Club: on a volunteer basis. “Trail advocacy” has been done locally for several years, but only on certain trails. There have been huge areas that have been neglected and left to their demise until recently. There seems to be a resurgence for taking care of our trails, and the volunteers that do that are incredible individuals worthy of a big THANK YOU! 

      I reached out to my good friend, Roy Flake; a man among men. He cut his teeth racing road bikes for Fresno State, SPOC, and other teams a few years back but has always had a love affair with the dirt. His insights into trail stewardship and why it’s vital to our local community are a reminder that we as cyclists can all learn and help each other be safer no matter what discipline(s) you’re into. Here’s what Roy had to say:

      There are two ways up the Goat Mountain trail. One is along the saddle of the mountain, further to the south, which consists mainly of a gradual fire road climb that winds itself up to the top at a consistent grade. It’s the favored route for most riders, as it’s easy to settle in over the thirty-or-so minutes to the top. The other, more difficult route is to climb the descent starting from the back of the campground. I prefer the later. Not only do I find it more demanding and challenging, but it gives me a chance to scope the trail condition before plummeting back down to the lake. As I ascend, I’ll likely find a reason to dismount— a low hanging branch that needs trimming, clearing debris, or the (unfortunately) more common than not fallen tree that has to be cut out. Years ago, I like many would have instead remained on my bike and pedaled around the obstruction. If I had to dismount to clamber over a fallen tree, or was inconvenienced by a rutted and washed out section, I’d likely get upset and feel that my ride was interrupted. Looking back, I’m disappointed on the perspective I had. The mindset of ‘someone else will take care of it’, or the complete obliviousness of how the trail “magically” mends itself. These are often what the mind reverts to on the trail. What appears to be work though, is in actuality opportunity. We’re fortunate enough to have multiple stewardship groups here in the county, all of which do a great job of keeping out trails clear, as well as building community. 

       We don’t realize how fortunate we are to live so close to such epic riding. The “Big Sandy” race is renowned across the state simply because of the San Joaquin River Trail (SJRT). The course is arguably one of the most dynamic in the valley.  Steep punchy climbs, loose rock gardens, and flowing single track that can surmount into a 30+ mile all day epic if one is up to it. From mid-Fall to late-Spring typically yield optimal riding conditions with lots of greenery, running creeks, and plenty of “hero dirt.” However, the cumulation of the drought a few years back, combined with heavy use has caused numerous erosion problems where ruts have formed (up to two feet in depth). Our local trail stewards, CCORC (Central California Off-Road Cyclists)are the main caretakers of the SJRT, and recently held a work day where some of the more extensive areas were addressed. These efforts are integral to keeping such a local recreational gem sustainable, and ought to be implemented by not only mountain bike clubs, but ALL recreational groups that utilize the River Trail. 

       Further North, and deeper in the mountains at the foot of Yosemite National Park is Bass Lake. An area locally renowned for big mountain riding at its finest, and home to some of the more technically demanding trails in the valley. It’s the perfect area for riders to flex their long travel bikes as well as their wits. Riders who choose to make the trek up to the tops of the fire look-outs are rewarded with incredible views of the Sierras, which are often surreal once the first snow of the season caps Mammoth Mountain in the distance. The dirt is for the most part decent year-round, due to the dense pine trees shadowing the trails. Sections resemble riding up in Oregon, making you feel you’re much further from home than you likely are. Again though, the drought along with the damage of the bark beetle combined with wind storms and recent wet seasons have weakened many trees and therefore would have closed all recreation had it not been for trail stewards. The recently formed “Yosemite South Gate Trail Cooperative” have come out, guns blazing, over the past year doing their best to keep the trails open. These trails are all multi-use as well, and commonly serve as recreation for hikers and horseback riders alike. 

       Chances are, even if you’ve only been riding for a few months and are from Fresno, you’ve likely heard of if not ridden both of these areas. Although trail stewardship should pertain to all groups/clubs that utilize the trails for recreational use, we as mountain bikers have proven to be some of the most active. So how can you help and aid in the efforts to keep our trails in operable condition year-round? Firstly, join a stewardship! Not only is it an excellent way to get involved in sanctioned work days, but it’s also an incredible opportunity to meet and ride with others who are passionate about the same things. 

      Secondly, most riders choose to carry a hydration pack of some form. These packs not only carry a water bladder, but will likely be able to hold some essential trail tools as well. I always carry a collapsible saw on my rides, and it’s neither cumbersome nor does it slow me down. Being able to remove small trees or limb a branch that could cause an accident is a fantastic way to be proactive on the trails— and it’s surprisingly fun! Obviously, riders must use discretion, as staying safe does supersede. 

      Lastly, for all those with smartphones, the app “Trailforks” in my opinion is essential. Not only does it show details of the trails in your area, but also the condition they’re in as well as any issues with it. If you notice something that needs addressing and aren’t prepared enough for the work, reporting it on Trailforks allows others including stewards to be aware of it. The app also displays the group who takes care of the area you’re viewing/riding, and will likely have a donation option to help with efforts. I make it a point to always donate when riding out of town as a ‘thank you’ to the local group(s) who make it possible for me to enjoy a ride elsewhere. 

       It’s likely you got into mountain biking because you enjoy the outdoors, the challenge, being around like people, and are passionate about physical recreation. Being an advocate of maintaining our local trails not only encompasses these same things, but enhances the enjoyment— it’s part of the sport, whether you realize it or not. The sense of accomplishment and pride in stewardship is much more rewarding than you moving up to 32nd from 33rd on the STRAVA segment. Whether or not you join a trail group, make a point to pack a saw on your next ride, or simply donate a few dollars to the stewards. Every bit counts and will help in keeping these areas open. I’ll see you out on the trail. 

    -Roy B. Flake

      Sustainability is the key word here. It’s true for all bike-related activities and all clubs that exist today. We have some of the best trails around, with incredible views and a wide mix of terrain. Thank you so much, Roy for your insight. 

      We as the Fresno Cycling Club can easily take this idea of stewardship and apply it to our own rides and groups. Should our ride leaders carry a tiny broom with them on group rides?  Should we all have the FresGo App on our phones to make sure we send all necessary photos to the city for minor and serious safety issues? Should we have a club roadside clean-up day? 

      What can we do as a club to better our riding environment and make it safer for the new riders getting into the sport that we all love and share? I always hear about cars buzzing us, or someone cut someone off, or a construction company leaving a sign in the bike lane. Let’s face it: cycling can be dangerous at times even when we follow the rules of the road. I encourage you to think of ways that we can get together and make our routes safer and more enjoyable for all of us. Tina Sumner (559.304.6390/advocacy@fresnocycling.com) is the Advocacy Director for the club and is always looking for help and new ideas. 

      Please feel free to get ahold of me for any ideas or concerns. 

    -Devin Bovee 

    559.797.0148 – Devin@stevensbicycles.com 

  • 02/28/2019 1:16 PM | Deleted user

      Most all of us have one of them. You know, the little bag hanging from the bottom of your saddle. Strapped so eloquently to your seat rails and post. Some have your favorite bike shop’s logo, some are blank, some are slim, and some are fat. It is 100% up to you and what you need for your rides. Some of us even have multiples bags for different adventures. 

      I get asked a lot “What should I carry?” and while my answer is somewhat generic, it is always 100% based on the type of riding and how comfortable the rider is with repairing their own flat tire or small mechanical issue. What size bag you need or prefer will be solely based on your needs as a rider and what you plan to carry.  Plus, what you are ok with leaving at home. 

      First let’s fill a basic seat bag.

    1. Bag. The seat bag should be able to close and suck up tight along the bottom of your saddle. We don’t want a saggy bag that waves back and forth while you’re riding: keep it tight! There are many types; some have Velcro straps, some have buckles, some have a clipping mechanism. No matter which one you have, make sure you’re are comfortable with the looks and feel of it on your bike. If you don’t currently mount your tail light to the seat post, make sure that the new bag you get has a place to mount a light to it. 
    2. Spare tube. This is a non-negotiable item if you are on a group ride, or any ride for that matter. You should always have a tube in your bag. Make sure the tube is the right size and make sure you either have a long enough valve or some valve extenders for deeper section wheels. **Pro Tip: Keep your spare tube in a small Ziploc bag and add some baby powder to it, this will allow for easy installation on the side of the road/trail and will protect the tube from punctures inside of the seat bag.
    3. Tire Levers. Some tire/rim combinations are a bit tough to get on and off the rim and require a little “leverage” from the levers in your bag. These handy little tools will assist you in removing the tire from the rim and can also help you to install the tire back onto the rim. These really shine on the last section of tire that wants to be stubborn. 
    4. Patch kit. The old fashioned tried and true glue patch kit. These little guys are cheap and reliable. They take just a few seconds longer than the pre-glued patch kits but are a more permanent and effective solution. Yes, these are the same ones that you used when you were a kid.
    5. Inflator. Here is where variety and preference will come into play. While compressed air or Co2 is the easiest away to inflate your tube on the side of the road, the air will leak out much faster than using a hand pump.  If you are ok with carrying a mini frame pump, these will keep air in the tires for much longer. However, they will not get you off the side of the road as fast. If you do buy one and plan to use it for a road bike, make sure it’s a “High Pressure” )not “High Volume” models as those are for gravel/mountain bikes). There are also many different styles of co2 inflator heads out there: some push and engage others you must twist.  Make sure you know how to use the head before needing to use it. Keep two 16-gram co2’s in your bag at all times for a road bike: you’ll thank me later.  
    6. Tire boot. Park tool makes a great tire boot kit that has an adhesive back and if used for a road bike you can turn a 3 pack into a pack of 6 very easily by cutting the big boots in half. These are far better than a dollar or a GU wrapper since the will hold the rip of tire together instead of just blocking the hole.  
    7. Multi Tool. Small and compact for the road bike is recommended. The basic multi tool should have a 3mm, 4mm, 5mm, 6mm, Phillips/Flat screwdriver, T25 Torx head and maybe one other item. Multi tools can come in many other combinations, such as having a chain breaker tool, co2 inflator head, tire lever, disc truing tool and other items. It’s all about how you feel about working on your own bike. If you want an excellent all around multi tool, I recommend the Blackburn Tradesman. 

      These are the basic items and anything else from here would be a personalization to your own bag. Keep in mind that routine maintenance on your bike (adding sealant to the tubes, changing worn parts and tires regularly) will keep that bag in its place and hopefully will never need to be used. 

      Some people will carry many other different items, such as latex gloves, folded up toilet paper, copy of license and insurance card. Whatever you decide to add to your own bag, make sure that it has a purpose and you are comfortable with using it. Don’t be the person who doesn’t have the stuff to fix their own flat, make sure your bag is always stocked and ready to go. 

    Let’s go over some items you may want to carry if you do different types of riding. 

    For example, a Gravel/Cyclocross or Mountain seat bag might include: 

    1. Tubeless Tire Repair Kit.  Great for patching up tears in the sidewall or tread of the tire without having to install a tube. Typically, these will come in the form of “Plugs” that are meant to get you home. You’ll want to head to your local bike shop to get a new tire after using one.
    2. Chain Breaker.  This tool will push the pins out from the center of the chain and will allow you to mend a broken chain or help with preparing the chain to install a chain master link. 
    3. Chain Master Link.  The unsung hero of the seat bag, this part will reconnect the chain after it has broken. The great thing about the master link is that there are no tools required for installation. 
    4. Tire Pressure Gauge. Whether you are into the digital gauges or old school analog, either way it’s a great idea to keep one on hand always while riding off road or on mixed terrains. The point of carrying the gauge is that it takes the guess work out of what your air pressure is, and allows you to finely adjust it to your riding style and weight. **Pro Tip: Buy a small frame pump or a mini pump that has a gauge on it. Lezyne offers a great solution for this in a High-Volume pump. 
    5. Zip Ties and Duct Tape. Does this really need an explanation? Keep a few of these handy for the situation that I hope you never find yourself in. 

    No seat bags were harmed in the writing of this blog.  However, Mr. Henry Pretzer had to put everything back into his bag after graciously taking a photo of his personal gravel seat bag. Kuddos to Henry for rocking the Road Runner seat bag.  Road Runner bags are made in Los Angeles, and do a fantastic job. 

  • 12/08/2018 7:39 PM | Deleted user

      Winter weather brings on more challenges than just bundling up on a cold morning or evening ride. Being seen is even more important in the colder months, since it brings fog, cloud cover, rain and shorter daylight times. How many times have you been in a vehicle traveling up Friant or Auberry and have barely noticed from a good distance the person or group of people riding their bikes?

      Sometimes I feel that we cyclists think that just because we can see a vehicle while riding our bike, the vehicle must see us. Obviously, this is not true. I have been guilty of it. Traveling in a vehicle at a much higher rate of speed around turns in the foothills can make it very difficult to see a cyclist. There are some ways that we can become more visible to those around us.  This not only protects us or the our group we are riding in, it also protects the family who may be riding in the vehicle as well. 

      While I have a lot of experience within this subject, I felt it was best to reach out to Tony Molina. Tony is the Vice-Chairman for the Fresno County Bicycle Coalition, plus a Certified Instructor with the League of American Bicyclists. He teaches classes that include this very subject. Here’s what Tony had to say:

    Smart Cycling for Winter Nights

      'Tis the Season of shorter days and longer nights, and for cyclists to be mindful of the modifications to daylight riding that night riding entails. Smart Cycling, the bicycle education program sponsored by the League of American Bicyclists, advises regarding night riding: “It's important to adjust your speed while riding at night as street hazards and obstructions can be harder to see. Nighttime can bring a higher incidence of impaired motorists due to fatigue, poor night vision and alcohol. 

      Remember that wet roads reduce the effectiveness of headlights. Relatively dim bicycle lights may get lost in a mass of brighter lights, so never assume a motorist has seen you. Even if you have properly equipped yourself and your bicycle for optimum visibility, be aware that you still may not be immediately visible to motorists. Don’t assume they can see you. 

      Be extra careful at intersections and when making left turns. Do not get caught in an intersection as the light turns red. Slow down if necessary, so you can stop on the yellow. If you must wait for oncoming traffic before turning left, stop before entering the intersection (not in it, as you would in daylight). 

      Most state laws require a headlight and red rear reflector for riding from dusk until dawn. Dirty reflectors and lights lose effectiveness. What lighting you select depends on your riding environment (lighted city streets, dark rural roads, etc.) and conditions (rain, fog, etc.) Lights can be either battery or generator powered. Regardless of the type of light you select, remember to carry a spare or extra battery. Not having a spare could make for a dark, dangerous ride. It's a good idea to take a nighttime test once you have your bicycle equipped. Have someone else ride your night-equipped bike as you would, to see how easily they can be seen. Then make any necessary adjustments for optimum visibility. Reflector vests provide additional visibility during the night.  

      During darkness, bicyclists should avoid wearing dark clothing and be aware that California DMV Code 21201 requires all four of the following for legal night time riding: 

    • A front lamp emitting a white light visible from a distance of 300 feet from the front and sides, which may be attached either to the bicycle or bicyclist. 
    • A rear red reflector or a solid or flashing red light with a built-in reflector visible from a distance of 500 feet. 
    • A white or yellow reflector on each pedal or on the bicyclist’s shoes or ankles visible from the front and rear at a distance of 200 feet. 
    • A white or yellow reflector on the front wheel, a white or red reflector on the rear wheel, or a white to the front and red to the rear of the bike reflectors or reflectorized tires. 

    -Tony Molina

      Thank you, Tony!  Bright and visible clothing is extremely important. In the winter, a high visibility color like yellow, orange, or green will draw a lot of attention to you and force people to be aware of your presence. In the evening or low visibility situations we want to make sure we have on as many reflective items as we can. We want to light up when a vehicles lights shine on us. The single best place to have reflective pieces is on our feet or our ankles: the moving of the reflector will increase our visibility significantly. Other places that need to have reflective pieces on them are on your jersey, bibs, seat bag, shoes, gloves, tires, your bike, helmet, jacket or warmers and basically anywhere you can put one. Most manufacturers (like Giant and Liv for example) include reflective logos on their winter apparel. In the daytime the logos look normal, but when the light hits them, they reflect light and really make us visible.

      Using headlights and taillights (both day and night) will significantly increase your visibility. Make sure your lights are charged, and in the daytime run on a flash setting. In foggy conditions having an extremely bright light, upwards of 30 lumens for the rear, will allow motorists to spot you from a great distance. The combination of lights you use should be seen from every direction around you. Don’t be the person holding his cell phone up and using it as a light: it doesn’t work very well. Headlights on a vehicle are around 1200 or so lumens. Keep in mind how hard it is to see those lights from a distance in the fog. If you can have a dedicated front light on as a beam and a high lumen count (900+) in the fog, you stand a very good chance of being seen from a safe distance. Don’t assume people see you in severe conditions, because they just may not. 

      The reality of riding on the road in less-than-perfect conditions needs to be taken seriously. We, as the Fresno Cycling Club, represent a large amount of the cyclists in the greater Fresno area.  We should be well-equipped and represent ourselves in high regard when it comes to safety. We need to be prepared to ride in whatever the day’s conditions are. If not, it’s not worth the risk. 

    -Devin Bovee

    Devin@stevensbicycles.com

    559.797.0148

  • 10/18/2018 9:04 AM | Deleted user

    Stop “Braking” my Heart.

       Rim brakes, cable-actuated disc brakes, hydraulic disc brakes. For road bikes these are the three main types of brakes that you will see. Follow along as I go through each type and break down each and why they are important.  But first:

    • Rim brakes have been used on road bikes for many years now and until recently have been the norm on most all road bikes. 
    • 2012 was really the first hint that disc brakes were going to come on road bikes. This type of brake was new to road biking, and would require a few changes to frames and wheels. 
    • Cable-actuated disc brakes were first, quickly followed by hydraulic disc brakes.  Mountain bikes have been using these for years and it’s finally come into the forefront on road bikes. The main differences between cable and hydraulic have been price and quality.  
    • But, there was also the question of “quick release” skewers and how they will play a roll in all of this. And also, what’s a thru axle? 

    Rim Brakes

       Let’s start with Rim Brakes. Traditional single pivot (Campy style) or newer dual pivot (Sram/Shimano style) rim brakes attach to the frame and fork via a long bolt that passes through the brake with a recessed nut on the back to secure it to the frame or fork.  Both front and rear brakes have a cable that runs from the brake lever to the caliper, then attaching to a pinch bolt which together operate the system. 

       Rim brakes work as follows:  When you pull on your brake lever, this pulls the cable and closes the caliper, pressing the brake pads against the braking strip of your rim, creating friction and slowing you down.  This system has worked great for a long time. The downside to riding on rim brakes (besides the lack of stopping power in wet conditions) is the fact that rim brakes wear down the side wall of your rims. 

       Manufacturers have built up extra thick “brake tracks” on the sidewalls to accommodate for this, but eventually it wears down. Small chunks of aluminum pieces from the rim or small pebbles can get stuck in the pads: this is something I find very often on bikes with rim brakes. Check your pads for these small pieces and pick them out, they will wear the side wall of your rim significantly faster than a clean brake pad and greatly compromises the stopping power of the braking system. These little pieces, if left unattended, will wear grooves into your braking strip creating ridges like in a vinyl album. The problem with that is when you apply the brake pad, it’s not making full contact with the sidewall of the rim.  Instead, it’s just grabbing the ridges, which doesn’t give you full power to stop the bicycle. 

    Disc Brakes - cable

      Cable-actuated disc brakes. The next step in the braking evolution. These brakes are a big step up from rim brakes and will increase your stopping power. They will allow for better stopping power in wet or misty conditions and don’t wear down the sidewalls of your rim. Cable-actuated disc brakes are identical in the way that it works to the typical caliper road brake. There is a single pivot and a dual pivot option.

       From the lever, the cable housing travels to the calipers, attaching to a pinch both that operates the system. The calipers are mounted on the non-drive side of the fork leg and the non-drive side of the chain stay in the rear. The single pivot option moves one pad and compresses the rotor against that pad and a stationary pad, creating friction and slowing you down. This system works great for most, and will continue to for many years. The pad service on these will be making sure that the pads have enough material on them to stop you and its not metal on metal. One thing to make sure of with these brakes is that your rotor is within at least one millimeter from the stationary pad without rubbing while riding. 

       Having the rotor this close will allow for the best contact with the pads and not bend your rotor unnecessarily. The dual pivot option moves two pads simultaneously, sandwiching the rotor between the two pads, creating friction and slowing you down. This system is the best of the cable-actuated disc brake systems, since it applies force to both sides of the rotor evenly. The service on the dual pivot is the same as the single pivot (except for the fact that your rotor will need to be centered between both pads to ensure even contact).

    Disc Brakes - hydraulic

       The ultimate in stopping power, modulation and control is  hydraulic disc brakes. Mountain bikes have been using these for years and it’s finally come into the forefront on road bikes. Hydraulic disc braking systems offer the best stopping power by displacing fluid from the brake lever and actuating the disc caliper (similar to what happens in your car). 

       With this system, you can safely operate the brakes and control the levers with one finger. This is by far the best system for people with smaller hands or folks that are very timid descenders. Since there is no friction built up from the cable running through the housing, the amount of force needed to engage the brakes is far less, resulting in a much smoother operation. With this system there are no issues with brake cables and housing being contaminated from riding in dirty or wet conditions  (however the fluid can become dirty after so long from brake dust creeping in from the pistons). 

       When filling the braking system with the recommended fluid (called “bleeding”), the number one goal is to eliminate all air bubbles from the system, creating a solid stream of fluid. If there is air is in your hydraulic brake system, it will make your brakes feel “spongy” or unresponsive. The hydraulic disc brake caliper moves two pistons simultaneously and sandwiches the pads against the rotor. The hydraulic brake requires the rotor to be “true,” since the area in between the pads is very tight. If the rotor is not true, you will hear a “shing” noise every time the rotor makes a revolution. 

      With the hydraulic system, you will need to bleed or replace your fluid once a year to ensure that you have no air or contaminates in the system. The wear on your pads will need to be monitored in the same fashion as a cable-actuated system, but when it comes time to replace the pads both pistons will need to be reset, as well as if you take your wheel out of the bicycle and accidently squeeze the lever. 

       With both styles of disc brakes, it’s important to make sure that no chain lube or oil gets on your rotors or embeds itself in your brake pads. I recommend never touching the part of the rotor that engages the pads, as oils on your hands can cause contamination. If your pads have been contaminated, you will feel the loss of stopping power immediately. There will most likely be a loud howling associated with that. As a side note, disc brakes will howl when wet as well, but that disappears as soon as they dry. 

    QR vs TA

       I mentioned “quick release skewers” and “thru axles” in the beginning.  I’d like to share the benefits of both very quickly. Disc brakes initially came out on road bikes with a quick release option.  For the most part this works, however the quick release can never really align the hub back into the drop outs the same, and never really hold the wheel tight enough. This allows the rotor to move or “flex” between the pads, potentially causing some rubbing issues. Hydraulic braking systems with skewers notice this more since the tolerance between the pads and the rotor is so tight. 

       Over the last couple of years, the bicycle industry has decided on using a 12mm diameter thru axle instead of a 5mm diameter quick release. They have also decided to stretch out the rear end of the bike to 142mm (instead of the previously used 135mm disc brake spacing). 

       A “thru axle” inserts the same as a quick release skewer, but instead of having a nut to put on the other end, the threads are part of the frame/fork and sandwich the hub together. This allows the hub to have a bigger surface to rest on and stiffens up the interface between the hub and the bicycle frame/fork. This does two things: first it stiffens up the hub allowing you to be more efficient with your power transfer into the bicycle and secondly it allows for better descending control since it’s predictable. 

       As we move farther with model changes and different genres of riding within the road category, you will notice a sharp decrease in the rim style brake bikes being offered. This will also be true for cable actuated disc brakes: especially the single pivot offering. These will be found on very entry level road/gravel/cross type bicycles. As hydraulic operated systems continue to decrease in price, and ways to “bleed the system” becomes faster and easier, you will notice a growth of hydraulic offerings on bikes.  

       If you are planning to buy a disc brake bicycle now or very soon, make sure that is has front and rear 12mm thru axles, with a 142mm rear end. If not, replacement options will be extinct very shortly. Disc brakes are newer to road bikes, and the current standard is a 142mm rear end and 12mm thru axle.  Make sure that any bike you are thinking of has that standard.  It will benefit you in the long run.   -Devin Bovee 

  • 06/24/2018 11:25 PM | Deleted user

       Rear derailleurs are impressive pieces of machinery. They eloquently move the chain from cog to cog with an effortless swing of the lever, or at least that’s what we want it to do! Parallelograms, pulleys, cable tension, cable and housing wear, derailleur hanger alignment along with many other factors affect the performance of your rear derailleur. It’s a simple, but very complex component controlled by a 4mm stainless steel cable and a lever. 

    What causes bad shifting? Here are some basics.

       Cables and Housing. When you swing the shift lever, in return you are pulling on a cable. The derailleur reacts, and moves a pre-determined distance based on brand and gearing. The same principle is applied when you release the cable, shifting into a higher gear. If the shift cable and housing are old and worn, this movement will not be easy. 

      Friction from dirt and everyday road debris will penetrate the housing through the ferrules, and embed itself between the cable and inner liner of the housing. Multiply that with the normal friction that occurs from rubbing a metal cable within a plastic sleeve and that’s how your cables become worn out, and your shifting can become inconsistent. Shift cables can also start to separate from the head and become lodged within your shifter, creating a rat’s nest. 

      The rule of thumb is to replace your cables and housing every year. Always try to replace with a “Low-friction” cable and housing (brands like SRAM, Shimano, and a few others offer this) Your local bike shop will always have these in stock. Keep your shift cables clean and lubricated to increase performance and reduce friction even farther.  Remember: friction is our enemy when it comes to shifting. 

       Cable Tension, Hanger Alignment, and Limit Screws.  Hanger alignment is the most important piece of this equation.  Without it, your limit-screw adjustments, cable tension and other adjustments will not be correct. The hanger aligns the derailleur with the cassette and the wheel, allowing the derailleur to shift properly throughout the gear range. This adjustment is made by using a hanger alignment gauge. Limit screws tell the derailleur where to stop. There is a screw forcing it to stop before it hits your spokes, and there is a screw stopping it from getting stuck between the high gear and the frame. 

      The most overlooked limit screw is the B Tension screw; this creates or removes a gap between your cassette and your jockey pulley. Cable tension is easily adjustable.  If your cable tension is off, your shifting will be inconsistent; too tight and shifting into high gears will suffer by not dropping onto the next gear, too loose and shifting into low gears will be tough and require two clicks to move it up the cassette. 

      Finding the correct cable tension is important and requires practice. A one quarter turn of the barrel adjuster can affect quality of your shifting in a big way. Be gentle with the barrel adjusters when adjusting and use them in very short increments.  Try and keep the cable tension tight enough to move up a gear but loose enough to allow the spring in your derailleur to close and move the chain down one gear on the cassette. 

        Worn Cassette, Pulleys, Chain, Pivots, Shifters. Worn parts are exactly that! Replace them. Worn parts can cause harm to us and others around us, so be responsible and replace your parts in a timely manner. 

      Don’t think you can get another few years on that chain because you probably can’t. When the chain becomes worn it does not engage with cassette fully, and can slip when applying a good amount of force (like climbing up a hill, or taking off from a stop light).  When you use a chain for too long, you will wear down the cassette and the two will “mate,” causing terrible shifting when a new chain is installed.   

    Cassettes will also become worn from riding: typically we recommend replacing your cassette after the life of two chains.  However, if you let your chain go for too long the cassette will need to be changed as well.  There are many other reasons bikes shift poorly (like neglecting the small stuff).  Keep in mind that pulleys can crack, or become sharp on the teeth like a ninja star. They will not move the chain correctly between the gears once worn. Pivots become loose from using your derailleur.  

      Looseness or “slop” in the pivots will affect the indexing making for inconsistent shifting. When the looseness in the pivots is detected, there is no fix but to replace the derailleur: this usually means you have gotten many thousands of shifts out of it and its lived its life. You can help extend the life of these pivots by keeping them clean and well lubricated. Shifters are mechanical pieces and require service just like any other moving part of your bicycle. Keep the shifters clean by peeling back the hoods and opening the levers, exposing the mechanical pieces inside. Spray a good degreaser in there and then lube the moving parts using a lightweight oil (like Phil’s Tenacious oil or even Tri-Flow).

       Treat each component right and it will treat you that way in return. Keep in mind that bikes are machines and need service just like your car. There are “normal” lifespans of components, and they should be monitored. 

       This is a very general overview of what can happen and some ways to fix issues. I will dive deeper into each part in later entries. If you ever have any questions I am always available via phone, email or in-store, thank you!

    -Devin Bovee  559.797.0148   Devin@stevensbicyles.com


  • 05/15/2018 9:51 AM | Deleted user

    Ouch, my butt hurts, my hands go numb, and my feet get hot. I hear these things a lot! When someone explains to me how much they dislike riding because of the pain and discomfort they are having, my next question is “Have you had a bicycle fitting?” The answer to this can go a few separate ways; 

    • “When I bought the bike, one of the sales guys put me on a trainer and made sure I was good,” or 
    • “I bought this bike used, but he said it should fit me fine.”

    Let’s go over what a bike fitting is, and what a bike fitting is not. A bike fitting is a full body comprehensive session that includes:

    • range of motion testing of the rider, 
    • flexibility testing, checking for limb discrepancies, 
    • stabilization of the rider on the bike, and 
    • sport or activity positioning based on the measurements taken. 

    The fitting process should start with a personal interview about you and what your goals are as a rider, along with any issues that you have on or off the bike. This interview will be followed by a full body assessment that takes real number measurements of your body’s capabilities and structure. Lastly, it’s you on the bicycle with the fitter manipulating the bicycle to fit your body in its most efficient and comfortable position (based on the numbers gathered from the assessment). What a fitting is not is someone having you get on a bike and saying “you look like you’re in an acceptable position” or maybe using a plumb bob to get close (that is an initial “sizing” of a person to a bike). 

    It is extremely hard to fit yourself.  I fit people for a living, and I struggle with my own bike fit at times. It requires more than a “fit yourself in two minutes” video to get it remotely close. 

    How do we become comfortable and efficient at the same time? By filling the void between how your body can naturally support itself and where your current bicycle setup is, using the numbers taken in the full-body assessment. This may require: 

    • raising or lowering the handlebars, 
    • rotating the handlebars and the shifters independent of each other, 
    • bringing the bars closer or moving them farther away, 
    • raising or lowering your saddle, 
    • adjusting the tilt, fore and aft on your saddle, 
    • measuring you for the proper saddle width, 
    • adjusting cleat positioning, 
    • supporting your arch and your forefoot where needed, 
    • creating a supportive platform on both the X and Y axis. 

    This is part of what happens in a proper fitting, and this is the road map for both comfort and efficiency. Every single person is different, and fittings vary widely. Don’t assume something that works for your riding buddy will work for you: most often it doesn’t. 

    Here are some tips for riding efficiently and what causes issues some of the most common issues:

    Don’t pedal in circles! There is a long-standing myth that pedaling in circles is the most efficient way to pedal.  I strongly disagree with this. When you push on one pedal and try to pull up on the other side you are shorting the amount of power (Watts) that the pushing leg can put out. The most efficient way to pedal is to push down on one pedal and let the other one come back up. If you apply all your energy to the pushing leg and “turn off” your pulling leg, that leg will naturally come up. Your body was not designed to push and pull at the same time: don’t weaken the leg that’s putting in 90% of the power to help the leg that only inputs 10% of the total power. I have had many conversations with fitting experts on this subject. The most recent has been with the head fitter of pro cycling team Lotto-Jumbo, whose data in their labs backs this up. When your leg reaches extension, turn it off and focus on the push. Use your quads, they are big for a reason!

    My hands go numb and tingle! Why are they going numb is the question? The answer is typically the rider compressing the Ulnar Nerve in their palm. This compression happens from being in a poor position relating to angle of your hands in conjunction with the shifters and handlebar positioning. This can be remedied by being placed in the proper supportive position while allowing your ulnar nerve to be free of compression. Gloves can also help to allow more room between your palm and the shifter, but gloves should be the supplement, not the “Fix”.

    Hot spots on your feet are caused by an irritation to the sesamoid bones in your foot. When irritated, these can cause a big irritation and make your ride very uncomfortable. Cleat positioning on your shoes are to blame here. Typically moving your cleats back a few millimeters will help to remedy this issue. The center of your cleat should bisect your first and fifth metatarsal bones. This measurement is easy to take by a professional while examining you on the bicycle. 

    Butt, butt, butt, I am in pain after a few miles. We all know this feeling, whether it’s on a 10-mile ride or a double century, it’s happened to most all of us at some point. What causes a sore bottom? There are many factors and many various places on your lower end that can hurt.  The most common is saddle positioning and shape. Your saddle should be in a position where it places you, the rider, on its widest part in a neutral fitting that stabilizes you. This positioning should allow for the center of your body to be centered over the bottom bracket of your bike, creating a solid foundation. 

    Time Waits for No One.  Always keep in mind that bodies and cycling positions change over time and with different disciplines. Sometimes a saddle that worked for you when you were 10 pounds heavier or lighter no longer works. Change your cycling shoes every couple of years and keep your bar tape, chamois, and gloves in excellent condition.  Use your local bike shop as a resource for a professional fitting: most of us have had some level of certified training. 

    These are just a few of the most common issues that I hear, so I wanted to address these first. If you are having issues on the bike or if you want to be in the most efficient position for you, get a professional fitting. Keep in mind that lasers are not always the best. Having the experience to use tools properly goes a long way to getting you dialed in. A good bicycle fitting will allow you to ride the type of rides that you want to without any discomfort or pain while making every single pedal stroke count as an efficient extension of your body. 

    -Devin Bovee 

    Devin@stevensbicycles.com

    559.797.0148

  • 03/27/2018 1:12 PM | Deleted user

       What happens when we take time off our bikes? Our “Bike Fitness” decreases; we lose speed, stamina, efficiency and we sometimes put on a few pounds. Sometimes you’ve got to be a few miles into a group ride to realize how far your fitness has slipped, especially when the group starts up the first hill on the ride. Legs are burning, breathing is deep, your lungs feel like they are on fire, and your heart is ready to thump right out of your chest! The confidence that you had at the end of the last season is gone. Rolling out past the city limits in a paceline has just left you completely drained and survival mode has now kicked in.  It’s time to get back in riding shape!

       How do we get our bike fitness back? For this, I reached out to Joe Booth, a local racer with the Fulton Race Team, cycling coach, and all around bad-ass. Joe is also the owner of Hammer Valley Coaching.  (email: hammervalley559@gmail.com)

    Coach Joe Says:

       How can we make the most of riding in the winter, and more importantly, how can we make the most out of having taken time off the bike, and work on regaining our strength in a fast, efficient manner? Daylight savings time and spring are here! For many of us, that just means getting on the bike a lot more than we have been for the last few months. What it doesn’t always mean is riding faster, longer, safer, and conquering new or old challenges.
       The first step to upping your game on the bike is to answer a few questions;

    • Where am I,
    • Where do I want to be,
    • What have I got to work with, and
    • What have I got to work around?

       These open-ended questions are what I ask of all my prospective clients.

    Where am I?  Subjective answers to this question are insightful but nothing beats objective data. My clients get put on a watt measuring device and tested. If you’re serious about improving performance on the bike a power meter is a fantastic tool.  It’s not a magic bullet but it’s close.

    Where do I want to be? This may be the real ‘magic bullet:’ setting a goal is one of the most important components to improvement. Answers to this open-ended question describe a client’s passion and motivation in cycling. I love clients who have a ‘shoot for the moon” goal. Then, we articulate a longer term SMART goal and as many short(er) term SMART goals as one can identify.

    What have I got to work with?  What are your strengths as a cyclist, personality traits, and lifestyle factors, and even the time frame of the goal itself that contribute to your success?

    What have I got to work around?  Health issues, family and work obligations, confidence or psychological issues, schedule, and lifestyle commitments that hold you back or limit your ability to reach your goal.

      Once you’ve made goals, you have to get a training plan. And, as different or novel as every plan claims to be, the good ones all structure training to address the demands imposed on the rider by their approach to the event. People have written hundreds of books with little tweaks to the recipe, but the ingredients are basically the same.  Base or foundation miles, build, event specific preparation, taper, and peaking phases.

    Coach Joe’s Tips:

      Most riders will progress by going longer between breaks. Especially when the weather is cooler and you’re not going through two water bottles an hour. Typically, I push longer duration intervals 15-60 minutes as the key to sustainable power, steady pedaling with minimal rest. On flat sections or up hills is best but rolling hills can work if they aren’t so steep that you stop pedaling on the descents. To top up the engine several shorter intervals of 4-6 minutes either as an interval session with 2-3 minute rest periods between or as part of a long ride. I’m more about the duration than the terrain. If you have a power meter it’s easy to know when you are at the right intensity. If you don’t have a power meter, then using hills gets the power in the right range.

      That is excellent advice.  I know I will be using some of his tips myself!  It wasn’t long ago that my bike fitness fell way off, and honestly, it still isn’t where it needs to be. I have been slowly working it back, using tools like what Joe described and have been seeing results on my own rides.  I’m finally feeling good standing out of the saddle and just enjoying riding my bike and not dreading the hills as much. Hopefully this helps you feel better, be faster and kick your riding buddies’ butts!

    Devin Bovee – Devin@stevensbicycles.com – 559.797.0148

  • 03/12/2018 4:36 PM | Deleted user


     How many times have you taken your bike into the shop, and the mechanic drops his “chain checker tool” into the chain and says, “We will need to replace your chain and cassette” ?

       Check, check, check your chain! It’s not uncommon to wear out a chain in 1,200 to 1,500 miles. A lot of riders can easily do that in a couple of months: you are probably one of them! It’s very common to forget about this vital component. The bicycle chain is the unsung hero for all your rides; when it’s bad your shifting is sloppy, and if worn out, can become dangerous. When it’s good, things are smooth and crisp. If your chain is worn to the point that it has worn out your cassette, it can slip under a heavy load and cause you to take a spill. This is the last thing we want, ever! A worn chain can also get stuck on a chainring or cassette cog, creating “chain suck,” which can damage your bicycle and possibly cause a crash. These two scenarios are real, and easily avoidable. Merely for safety, check your chain regularly.  At least every few weeks if you ride consistently. The chain is the connection between what we put into the bike and what we get out of it. If there is no chain, your bike is essentially a fancy “balance bike,” so you better be good to it!

       Chains generally wear from the inside out, and in a couple of separate ways. The most common wear is in the pins and rollers located inside of your chain. These moving parts take all the grunt when you are climbing up a steep pitch, standing up for the sprint or spinning at 110 rpm’s.  The parts continuously rub against one another creating grooves, which then allows the chain to stretch from the inside out. Therefore, a good chain lube is extremely important.  It helps reduce the amount of friction between these two moving parts, thereby extending the life of your chain. If you have ridden with someone and you’ve heard a sound like birds chirping, it’s because their chain needs some lube. How annoying is it when you’re climbing a long hill and your buddy’s bike is making a high pitch chirp on every pedal stroke?  I carry a small packet of lube for these folks in my seat bag (for my own sanity).

       The other type of wear is from someone who mashes on the pedals in a high gear, “cross chains” a lot, and/or puts down some serious watts. This type of wear isn’t within the pins and rollers, instead it impacts the side-to-side rigidity of the chain. When this type of wear happens, it makes for terrible, inconsistent shifting on the cassette and chain rings. Think of a wet noodle versus a dry one and trying to move it between gears!

       So, what can we do to avoid a big shop bill and keep safe? You can start by checking your chain wear. There are multiple methods and tools for doing this. The most common is a drop-in style “chain checker” from either Park Tool, Shimano, or Pedro’s. All three brands have great chain checkers; my favorite happens to Shimano’s TL-CN42 chain wear indicator. This tool pushes the worn roller against the worn pin using a three-prong design. It allows true measurement of the worn parts inside of the chain. Use a tool at home or bringing the bike down to your local bike shop for measurement every few weeks to a month to save money and save yourself from any injury.

       Basic maintenance of your chain is easy, and anyone can do it in five minutes or less. Here are a few suggestions on chain lube and how to use it along with how to measure chain wear at home.

    Start by grabbing the supplies:

    • an old rag or two,
    • some sort of degreaser (Finish Line Speed Degreaser is my favorite) and
    • a good chain lube.

       One note on the chain lube; if it’s summer and you are riding in dry conditions, use a “dry lube” that’s paraffin wax** based, like Rock N Roll Red. If you are riding in wetter months, use a “wet lube” like Rock N Roll Clear or Blue.  But, if you are like most riders, just grab a bottle of the Rock N Roll Gold and call it a day: this will cover all the bases and keep things running smoothly.

    **The liquid in the paraffin wax lube is typically a cleaner and travel agent for the wax: make sure to give the bottle a good shake before applying to ensure maximum penetration. **

    Please, please, please never use: 

    • motor oil, 
    • tri flow and 
    • do not ever under any circumstance use WD-40 aerosol as a lubricant! 

    If you are unsure what lube would suit you and your riding conditions best, give me a call or shoot me an email and I will be happy to help you. 

    How to lube your chain:

    1. Spray the degreaser on an old rag, then hold the wet portion of the rag somewhat loosely around the chain.  Pedal the crank backwards, and this will remove any grit on the outside of the chain. You will never get it perfect unless you have a parts washer, so just focus on getting the old lube and grime off. Pro tip: Lay an old rag under the chain to collect the greasy droppings.
    2. Allow a few moments for your chain to dry.
    3. Spin the pedals backwards once again and apply the lube on top of the chain where it exits the bottom pulley, applying the lube to the middle of the chain. This will give the lube the maximum time to soak into the chain to coat the pins and rollers where we want it. Spin the pedals backwards three to four full rotations to make sure the lube has hit every link. If you want to be more precise, apply one coating to each side of the chain between the rollers and the outer plates.
    4. With a different rag (or a clean part of your first rag), pedal the crank backwards again, wiping off the excess lube.  A few good turns of the pedals will be fine, or until you are satisfied.
    5. Let the lube “set up” for a couple moments.
    6. Go ride!

    How to check your chain for wear:

    1. Grab your favorite drop-in chain checker tool.
    2. Apply a small amount of force to the pedal to bring the chain taut.
    3. Insert the back end of the chain checker tool into the top of the chain, and see if the front side with the gauge falls into the chain between the links. Do not force it in! If the tool falls in with no effort, it’s time to replace the chain.
    4. Insert the chain checker in between the bottom pulley and the chain ring. See if it drops in. (This allows you to measure two separate portions of the chain).  If it falls in, it’s time to replace the chain.


    **Follow manufacturer instructions for chain checkers with multiple numbers and double-sided gauges.  This will help you determine whether you should replace your cassette as well. As a rule of thumb, if you stay up-to-date on replacing your chain in a timely manner, you can get two chains before replacing your cassette. If you are not sure if your cassette is worn, there is a cassette wear measuring tool. If you’re curious, come in and I will measure it for you. **

    We will go over how to replace chains and cassettes very soon, if you have any questions you can always reach me via email, in-store or by phone.

    -Devin Bovee

    Devin@stevensbicycles.com

    559.797.0148

  • 02/14/2018 7:09 PM | Deleted user

    “Hello bar tape, my old friend. I’ve come to ride with you again.”

        When it looks good, it looks good! New bar tape and a good bike wash are effortless ways to improve your bike’s looks and ride quality, but what else can it tell us?  What lies beneath the torn, gap-ridden strip of bar tape that’s been with you for 5 years might shock you.

       Depending on how much you ride and how many different hand positions you use, after a riding season your bar tape will become severely depressed.  No, no that type of depressed.  I am talking about losing the cushioning and elasticity that it once had.  All those pesky little vibrations from the road can creep up from your handlebars into your hands, working up through your arms, and into your neck and shoulders.  Changing your bike’s bar tape will not only help to keep your bike looking fresh, but it will also keep you more comfortable for longer days in the saddle.

       When we ride, we sweat easily because we ride in a very hot climate.  We lose salt from our bodies and it must go somewhere.  We all see the gritty white residue on our gloves, helmet straps, and cycling shorts.  One place most people never think of it going is under your bar tape. Well, it does, and let me tell you, it can cause some serious safety concerns.  Sweat that travels through your bar tape can start to corrode your handlebars, shifter mounting straps, cables and housing. Handlebars, cables and shifters can potentially fail, causing significant injury.  The salt can actually wear holes in your handlebars!  Imagine riding down a hill at 35mph+ and your handlebars falling apart because you haven’t changed your tape in a few years.  This is possible and real, so let’s change it.  

       When we clean and replace, we learn about our bikes.  We learn what should be there, and what shouldn’t be.  As a mechanic, I have spotted countless broken parts and frames, and it’s the worst phone call I ever have to make to a customer.  If you have a shop do all your maintenance, that’s great: they probably recommend changing it when you bring it in.  It’s $20-$40 for a good bar tape, which is pennies for the comfort and safety that come with it.

    Now, let’s wrap!

       First, remove the old bar tape and any remnants of old tape or adhesive.  If you are having trouble getting it all off, a good degreaser like Finish Line Speed Degreaser will make short work of it.

       Once the tape is removed, inspect the bars, shifter mount straps, cables and housing. This is the best time to change any of those since they live under the bar tape.  Peel back the shifter hoods, and let them hang back for a minute: we want these out of the way.  Look for any signs of corrosion or rust, and replace parts if found.  

       When all is clean, grab some isopropyl alcohol and spray it onto the side of the handlebar you will be wrapping first, then wipe off with a clean rag.  If you’re enjoying the other type of alcohol, cheers!

      There are multiple ways to wrap bars (and we can cover different methods later), but today I want to cover the most commonly-used method.

         Pull out your new roll of bar tape, bar-end plug and little filler piece from the box. If your tape didn’t come with a filler piece, cut three inches off from the bottom of your bar tape roll and use that. If your bar plug has a bolt in the center, make sure you have the tool handy: typically, it’s a 3mm Allen wrench. You will also need a pair of scissors, some electrical tape and a little bit of patience. Pro tip: Make sure the scissors and electrical tape are within arm’s reach.

       Starting at the very bottom of the bars we are going to let the tape hang off about ½ to ¾ inch. From there we are going work our way up the handlebar overlapping half of the tape as we go. Make sure to apply pressure to the tape as you wrap: you don’t need to stretch it, but it should be pulled taught. We wrap the right side clockwise and the left counter-clockwise. Every pass should be even and consistent.
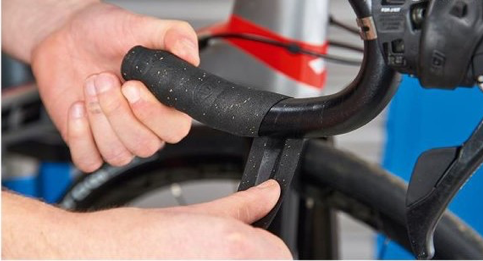
       When we reach the bend, things are going to change. Our overlapping will become tighter on the inside of the bar, but we will continue to keep the overlap consistent on the outside.

       Now we should be near the shifters. Grab your filler piece and wrap it under the bar covering the shifter mounting strap and touching the sides of the shifter body. Bring the tape up to it and wrap one rotation over it, so it becomes locked in place.
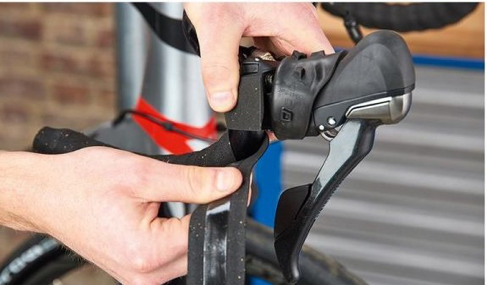
       This is a tricky part: once you have passed over the filler piece one full rotation, you are going to wrap upwards from the outside of the shifter and overlap the top of the shifter where it meets the handlebar. Continuing onto the top portion of the handlebars. That filler piece should have covered any gaps on the sides when completed so it has a uniform look.
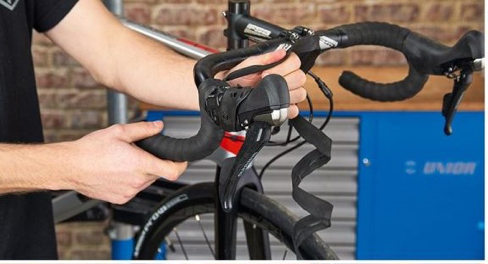
      Whew, fantastic job! Now, we need to keep going to towards the stem, keeping our outside gaps consistent around the bend, across the tops and ending in your desired location. Typically, if your bar diameter tapers up towards your stem you’ll want to finish it where the taper disappears and its consistent across the top of your handlebar. If you don’t have a taper, finish just outside the logo or anywhere you feel that fits you best.  Wrap the tape all the way to the finish point and unwrap two revolutions.

       Holding the tape at the same angle that it would be wrapped, create a perpendicular line to the finish point on the handlebar: this is visual line and you can only cut once so take a couple extra seconds here to make sure its lined up. Cut the bar tape along the visual line which should be at a 90-degree angle to the handlebars. 
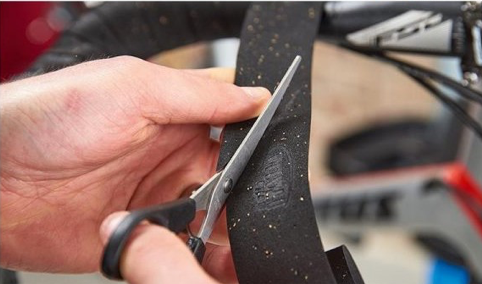
    Wrap the bars to the finish point creating a nice, clean finish line with the bar tape. Hold the tip of the bar tape with your finger and apply the electrical tape just behind your finger. Wrap the electrical tape in the same direction as the bar tape bringing the electrical tape to the outside edge of the bar tape for a clean finish. Wrap the electrical tape two to three revolutions and cut, making sure the end is on the bottom side of the handlebar. If your bar tape came with a finishing tape you can apply that to the top or leave the black electrical tape: it’s all preference.

       Remember the initial overhang at the bottom of the bar?  Let’s take care of that. If your bar end has a bolt in the center take your wrench and loosen it up just a little bit allowing the wedge to move towards the back of the plug. Take your finger and stuff the overhanging bar tape into the end of your handlebar, and insert the bar end plug.  Make sure all the tape is inserted and apply pressure to the plug.  If yours just pushes in, make sure its inserted all the way: a good tap with a rubber mallet usually confirms that.  If yours has the bolt, tighten it to the correct torque specifications or until its snug.

       That’s all there is to it!  Stand back and admire your work!!

    Devin Bovee

    Devin@stevensbicycles.com

    559.797.0148
  • 02/08/2018 7:25 AM | Deleted user

       I remember being in my early 20’s, walking into an old bike shop in the Bay Area and being blown away by how much it was going to cost to fix my bike. Keep in mind I am using the term “bike” loosely here:  it was an early 1990’s Gary Fischer that I had recently bought from a less-than-reputable used bike shop. I was new rider at that time, plus I was looking for a deal.  I rode this bike for a while and thought nothing was wrong with it. I figured that it was normal to double click the shifter to make the gears change and had no idea how a bike was supposed to properly work. My riding experience was very limited and so was my knowledge of bikes. After doing a little bit of reading I started to notice things wrong with my bike and quickly realized I had bought a turd on two wheels.  Pissed off and knowing that confronting the owner of the used bike shop would get me nowhere, I ventured into a long-standing bike shop in Berkeley, “The Missing Link.” This was a real bike shop and I was intimidated! They had racing jerseys and dust on the walls older than me. These folks lived and breathed cycling.

       My goal here was to look around a little bit and possibly get my bike fixed. One of the first things a woman working there helped me with was rolling up my right pant leg, or using a strap, to keep it away from the greasy drive train. Since my bike was my main mode of transportation around the bay, she had just saved me a ton of money in new pants. We got to talking and she asked me about my bike and I had told her about the issues I’ve been having. She told me to go across the street to the mechanics’ shop and talk with those guys. Yes, the mechanics’ shop for the store was on the other side of Shattuck Ave., in downtown Berkeley. 

       Walking into the mechanic’s shop, I remember smelling the old greasy bike parts, and I loved it. The mechanic was an older man in his 60’s I would say. He asked me what issues I have been having, and  I explained to him what I thought was wrong, and finished with “it probably just needs a quick once over.” After a few minutes or so, he came back with a pile of parts in his hands. He started writing up the estimate. As I am freaking out by the size of the pile he says, “It’s going to be around $250 to get your bike working the way it should.” I was thinking this guy is trying to screw me over. $250 bucks for a bike that cost me $50, are you crazy? Keep in mind I am in my early 20’s working and living away from my parents: I am broke!

       Luckily, I had just gotten paid the day before, and had the little bit of cash I was making at the time. I agreed to have the work done, and I told the mechanic “I’ve got a few errands to run in the neighborhood and I’ll pick my bike up in a couple of hours.”  He must have liked that comment, because he chuckled and said he would have it done two days later. I paid the man and walked home. After two days of taking the B.A.R.T. train and walking, I went back to pick up my bike.

       The mechanic wheeled my bike from around the counter. My new shifters looked good, the new brakes and matching tires he had installed looked great. He took a minute and explained what he had done, and pointed out a few things to check every now and then.  I listened, told him “thank you” and left. Walking out, I was ready to go for a ride and excited about not having to walk anymore. I jumped on my bike and it rolled soooo good! The tires he had recommended were just what I needed. I was off the knobby mountain bike tires and on a set of smooth center hybrid tires that felt like they could roll forever. When I clicked the shifter, it would change gears so smoothly and the brakes, let me tell you, the brakes worked and didn’t squeal. I was ecstatic!

       This man had taken my bike and turned it into an extension of me.  I was proud to ride this bike now and loved it. When I got home, I started to read all about the parts he had installed, and how to do the basic upkeep on my bikes from there on out.  If it wasn’t for this man taking my turd and turning it into a masterpiece, I would never had found my true passion for bikes and cycling, and am grateful for having that experience.

       There have been some other influencers in my cycling life since then, but The Missing Link bike shop was the start. That experience changed me. It taught me about paying for what you get, and trusting your local bike shop. I continued to use the same bike shop when I lived up there, and still pop in to buy something when I am in the area. The mechanics’ shop is no longer across the street, but the dust is still old.

       Be sure to find a good local shop and trust them.  They might not always have what you need at that very moment, but they can most always get it. They are a “hub” for growing our community of cyclists and share the same passion for cycling that you do. They live and breathe everything bike and have the experience, training and knowledge to back it up. They will never be able to compete with Amazon on price, but any good bike shop will provide you with so much more than any online anything can ever provide: the human connection and the memories that go with that.

       See you on the next ride!

    -Devin Bovee

    Devin@stevensbicycles.com

    559.797.0148

<< First  < Prev   1   2   Next >  Last >> 
Powered by Wild Apricot Membership Software