“Hello bar tape, my old friend. I’ve come to ride with you again.”
When it looks good, it looks good! New bar tape and a good bike wash are effortless ways to improve your bike’s looks and ride quality, but what else can it tell us? What lies beneath the torn, gap-ridden strip of bar tape that’s been with you for 5 years might shock you.
Depending on how much you ride and how many different hand positions you use, after a riding season your bar tape will become severely depressed. No, no that type of depressed. I am talking about losing the cushioning and elasticity that it once had. All those pesky little vibrations from the road can creep up from your handlebars into your hands, working up through your arms, and into your neck and shoulders. Changing your bike’s bar tape will not only help to keep your bike looking fresh, but it will also keep you more comfortable for longer days in the saddle.
When we ride, we sweat easily because we ride in a very hot climate. We lose salt from our bodies and it must go somewhere. We all see the gritty white residue on our gloves, helmet straps, and cycling shorts. One place most people never think of it going is under your bar tape. Well, it does, and let me tell you, it can cause some serious safety concerns. Sweat that travels through your bar tape can start to corrode your handlebars, shifter mounting straps, cables and housing. Handlebars, cables and shifters can potentially fail, causing significant injury. The salt can actually wear holes in your handlebars! Imagine riding down a hill at 35mph+ and your handlebars falling apart because you haven’t changed your tape in a few years. This is possible and real, so let’s change it.
When we clean and replace, we learn about our bikes. We learn what should be there, and what shouldn’t be. As a mechanic, I have spotted countless broken parts and frames, and it’s the worst phone call I ever have to make to a customer. If you have a shop do all your maintenance, that’s great: they probably recommend changing it when you bring it in. It’s $20-$40 for a good bar tape, which is pennies for the comfort and safety that come with it.
Now, let’s wrap!
First, remove the old bar tape and any remnants of old tape or adhesive. If you are having trouble getting it all off, a good degreaser like Finish Line Speed Degreaser will make short work of it.
Once the tape is removed, inspect the bars, shifter mount straps, cables and housing. This is the best time to change any of those since they live under the bar tape. Peel back the shifter hoods, and let them hang back for a minute: we want these out of the way. Look for any signs of corrosion or rust, and replace parts if found.
When all is clean, grab some isopropyl alcohol and spray it onto the side of the handlebar you will be wrapping first, then wipe off with a clean rag. If you’re enjoying the other type of alcohol, cheers!
There are multiple ways to wrap bars (and we can cover different methods later), but today I want to cover the most commonly-used method.
Pull out your new roll of bar tape, bar-end plug and little filler piece from the box. If your tape didn’t come with a filler piece, cut three inches off from the bottom of your bar tape roll and use that. If your bar plug has a bolt in the center, make sure you have the tool handy: typically, it’s a 3mm Allen wrench. You will also need a pair of scissors, some electrical tape and a little bit of patience. Pro tip: Make sure the scissors and electrical tape are within arm’s reach.
Starting at the very bottom of the bars we are going to let the tape hang off about ½ to ¾ inch. From there we are going work our way up the handlebar overlapping half of the tape as we go. 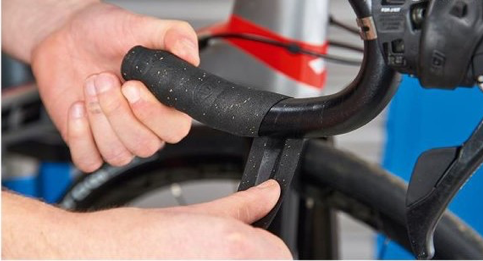 Make sure to apply pressure to the tape as you wrap: you don’t need to stretch it, but it should be pulled taught. We wrap the right side clockwise and the left counter-clockwise. Every pass should be even and consistent.
When we reach the bend, things are going to change. Our overlapping will become tighter on the inside of the bar, but we will continue to keep the overlap consistent on the outside.
Now we should be near the shifters. Grab your filler piece and wrap it under the bar covering the shifter mounting strap and touching the sides of the shifter body. Bring the tape up to it and wrap one rotation over it, so it becomes locked in place.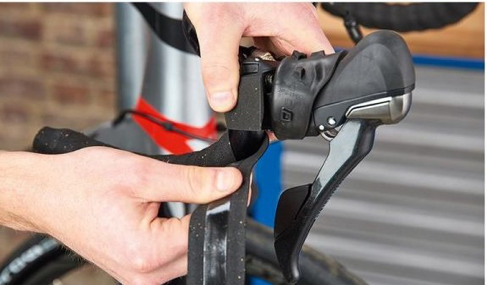
This is a tricky part: once you have passed over the filler piece one full rotation, you are going to wrap upwards from the outside of the shifter and overlap the top of the shifter where it meets the handlebar. Continuing onto the top portion of the handlebars. That filler piece should have covered any gaps on the sides when completed so it has a uniform look.
Whew, fantastic job! Now, we need to keep going to towards the stem, keeping our outside gaps consistent around the bend, across the tops and ending in your desired location. Typically, if your bar diameter tapers up towards your stem you’ll want to finish it where the taper disappears and its consistent across the top of your handlebar. If you don’t have a taper, finish just outside the logo or anywhere you feel that fits you best. Wrap the tape all the way to the finish point and unwrap two revolutions.
Holding the tape at the same angle that it would be wrapped, create a perpendicular line to the finish point on the handlebar: this is visual line and you can only cut once so take a couple extra seconds here to make sure its lined up. Cut the bar tape along the visual line which should be at a 90-degree angle to the handlebars. 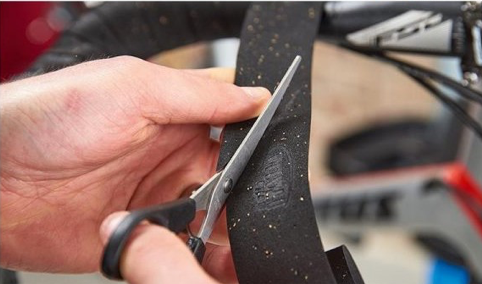
Wrap the bars to the finish point creating a nice, clean finish line with the bar tape. Hold the tip of the bar tape with your finger and apply the electrical tape just behind your finger. Wrap the electrical tape in the same direction as the bar tape bringing the electrical tape to the outside edge of the bar tape for a clean finish. Wrap the electrical tape two to three revolutions and cut, making sure the end is on the bottom side of the handlebar. If your bar tape came with a finishing tape you can apply that to the top or leave the black electrical tape: it’s all preference.
Remember the initial overhang at the bottom of the bar? Let’s take care of that. If your bar end has a bolt in the center take your wrench and loosen it up just a little bit allowing the wedge to move towards the back of the plug. Take your finger and stuff the overhanging bar tape into the end of your handlebar, and insert the bar end plug. Make sure all the tape is inserted and apply pressure to the plug. If yours just pushes in, make sure its inserted all the way: a good tap with a rubber mallet usually confirms that. If yours has the bolt, tighten it to the correct torque specifications or until its snug.
That’s all there is to it! Stand back and admire your work!!
Devin Bovee
Devin@stevensbicycles.com
559.797.0148